【Smart】記事リストのカスタマイズ方法
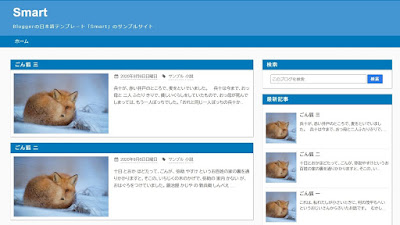
自作テンプレート「Smart」の記事リスト部分の変更方法をまとめておきたいと思います。
コメントで質問を受けることがあるので、その度に内容を追記していこうと思います。
記事リストのソース該当部分
Smartのソースコードの中から、記事リストに該当する部分を切り出しました。
記事リストを改変したい場合は、以下の部分を改変して下さい。
HTML
<b:includable id='articles'>
<!-- schema -->
<div class='articles-wrap' itemscope='itemscope' itemtype='http://schema.org/BlogPosting'>
<b:if cond='data:post.thumbnailUrl'>
<meta expr:content='data:post.thumbnailUrl' itemprop='image_url'/>
</b:if>
<meta expr:content='data:blog.blogId' itemprop='blogId'/>
<meta expr:content='data:post.id' itemprop='postId'/>
<a expr:href='data:post.url'>
<div class='articles-area'>
<i aria-hidden='true' class='fa fa-calendar fa-fw'/>
<div class='article-post-date'>
<data:post.date/>
</div>
</div>
</div>
</div>
</a>
</div>
</b:includable>
<!-- schema -->
<div class='articles-wrap' itemscope='itemscope' itemtype='http://schema.org/BlogPosting'>
<b:if cond='data:post.thumbnailUrl'>
<meta expr:content='data:post.thumbnailUrl' itemprop='image_url'/>
</b:if>
<meta expr:content='data:blog.blogId' itemprop='blogId'/>
<meta expr:content='data:post.id' itemprop='postId'/>
<a expr:href='data:post.url'>
<div class='articles-area'>
<h2 class='article-title' itemprop='name'>
<data:post.title/>
</h2>
<div class='article-post-wrap'><data:post.title/>
</h2>
<!-- サムネイル -->
<div class='article-thumbnail'>
<!-- 記事に画像がある場合 -->
<b:if cond='data:post.firstImageUrl'>
<img expr:src='data:post.firstImageUrl'/>
<!-- 記事に画像が無い場合 -->
<b:else/>
<!-- 自分の画像URLに変更する -->
<img src='https://blogger.googleusercontent.com/img/b/R29vZ2xl/AVvXsEh9y95lAZy1r4xHYohM2KDIbq2Q38idZJcrA7X2TZddCI7SCXmr8ct3N85sL044kcBxyK2e3VdXXeZyFfwOVbwZXlmSgkIFDV22eb8CUNnz0zICE3SJ6QNVOoOifphetfBIRbnQlxkJFGGA/s1600/noimage.png'/>
</b:if>
</div>
<div class='article-post-area'><div class='article-thumbnail'>
<!-- 記事に画像がある場合 -->
<b:if cond='data:post.firstImageUrl'>
<img expr:src='data:post.firstImageUrl'/>
<!-- 記事に画像が無い場合 -->
<b:else/>
<!-- 自分の画像URLに変更する -->
<img src='https://blogger.googleusercontent.com/img/b/R29vZ2xl/AVvXsEh9y95lAZy1r4xHYohM2KDIbq2Q38idZJcrA7X2TZddCI7SCXmr8ct3N85sL044kcBxyK2e3VdXXeZyFfwOVbwZXlmSgkIFDV22eb8CUNnz0zICE3SJ6QNVOoOifphetfBIRbnQlxkJFGGA/s1600/noimage.png'/>
</b:if>
</div>
<h2 class='article-title-res'><data:post.title/></h2>
<div class='article-info-area'><i aria-hidden='true' class='fa fa-calendar fa-fw'/>
<div class='article-post-date'>
<data:post.date/>
</div>
<div class='article-post-tag'>
<!-- タグがあるがどうか -->
<b:if cond='data:post.labels'>
<i aria-hidden='true' class='fa fa-tag fa-fw'/>
<b:loop values='data:post.labels' var='label'>
<div class='article-label'>
<data:label.name/>
</div>
</b:loop>
<!-- タグが無い場合は非表示 -->
<b:else/>
</b:if>
</div><!-- タグがあるがどうか -->
<b:if cond='data:post.labels'>
<i aria-hidden='true' class='fa fa-tag fa-fw'/>
<b:loop values='data:post.labels' var='label'>
<div class='article-label'>
<data:label.name/>
</div>
</b:loop>
<!-- タグが無い場合は非表示 -->
<b:else/>
</b:if>
</div>
<!-- 記事の要約 -->
<div class='post-snippet'>
<b:eval expr='data:post.snippet snippet {length: 110, links: false, linebreaks: false, ellipsis: true}'/>
</div>
</div><div class='post-snippet'>
<b:eval expr='data:post.snippet snippet {length: 110, links: false, linebreaks: false, ellipsis: true}'/>
</div>
</div>
</div>
</a>
</div>
</b:includable>
CSS
/* 記事リスト
---------------------------------------------------------------------------- */
/* 記事リストのリンク(全体) */
.articles-wrap a:link {
display: block;
text-decoration: none;
}
.articles-wrap a:hover {
opacity: 0.6;
}
/* 記事リスト全体 */
.articles-area {
background: $(article.background.color);
margin-bottom: 20px;
border-left: 1px solid #ddd;
box-shadow: 1px 1px 2px rgba(0,0,0, .4);
}
/* 投稿タイトル */
.article-title {
font-size: 16px;
letter-spacing: 2px;
text-decoration: none;
font-weight: bold;
background: $(article.title.background.color);
color: $(article.title.color);
padding: 6px 15px;
margin: 0;
}
.article-post-wrap {
display: flex;
position: relative;
height: 200px;
padding: 10px;
}
/* サムネイル */
.article-thumbnail {
width: 70%;
margin-right: 15px;
overflow: hidden;
}
.article-thumbnail img {
width: 99%; /* 境界線を表示するため */
height: 99%;
border: solid 1px #ddd;
object-fit: cover;
}
/* サムネイル右のエリア */
.article-post-area {
width: 100%;
height:100%;
overflow: hidden;
}
.article-info-area {
display: flex;
flex-wrap: wrap;
align-items: baseline;
font-size: 13px;
color: $(article.info.color);
height: 24px;
overflow: hidden; /* タグがはみ出ると消えるようにする */
}
.article-post-date {
display: inline-block;
margin-right: 1em;
border-bottom: dashed 1px $(article.info.color);
margin-bottom: 2px;
}
.article-label {
display: inline-block;
border-bottom: dashed 1px $(article.info.color);
padding: 2px 0;
margin-right: 2px;
}
.fa-calendar {
margin-right: 6px;
}
.fa-tag {
margin-right: 3px;
}
/* 要約文 */
.post-snippet {
font-size: 14px;
line-height: 1.7em;
color: $(article.description.color);
margin: 15px 0;
overflow: hidden;
}
.article-title-res {
display: none;
}
@media (max-width: 560px) {
.article-title {
display: none;
}
.article-title-res {
display: block;
font-size: 16px;
color: $(article.res.title.color);
height: 78px;
margin-bottom: 5px;
overflow: hidden;
}
.article-post-wrap {
height: 105px;
border-top: solid 3px $(article.res.border.color);
}
.article-thumbnail {
width: 102px;
min-width: 102px;
height: 102px;
margin-right: 10px;
}
.article-thumbnail img {
width: 100px;
height: 100px;
}
.article-post-date {
margin: 0 5px 0 0;
}
.fa-calendar {
margin-right: 3px;
}
.fa-tag {
margin-right: 0;
}
.post-snippet {
display: none;
}
}
---------------------------------------------------------------------------- */
/* 記事リストのリンク(全体) */
.articles-wrap a:link {
display: block;
text-decoration: none;
}
.articles-wrap a:hover {
opacity: 0.6;
}
/* 記事リスト全体 */
.articles-area {
background: $(article.background.color);
margin-bottom: 20px;
border-left: 1px solid #ddd;
box-shadow: 1px 1px 2px rgba(0,0,0, .4);
}
/* 投稿タイトル */
.article-title {
font-size: 16px;
letter-spacing: 2px;
text-decoration: none;
font-weight: bold;
background: $(article.title.background.color);
color: $(article.title.color);
padding: 6px 15px;
margin: 0;
}
.article-post-wrap {
display: flex;
position: relative;
height: 200px;
padding: 10px;
}
/* サムネイル */
.article-thumbnail {
width: 70%;
margin-right: 15px;
overflow: hidden;
}
.article-thumbnail img {
width: 99%; /* 境界線を表示するため */
height: 99%;
border: solid 1px #ddd;
object-fit: cover;
}
/* サムネイル右のエリア */
.article-post-area {
width: 100%;
height:100%;
overflow: hidden;
}
.article-info-area {
display: flex;
flex-wrap: wrap;
align-items: baseline;
font-size: 13px;
color: $(article.info.color);
height: 24px;
overflow: hidden; /* タグがはみ出ると消えるようにする */
}
.article-post-date {
display: inline-block;
margin-right: 1em;
border-bottom: dashed 1px $(article.info.color);
margin-bottom: 2px;
}
.article-label {
display: inline-block;
border-bottom: dashed 1px $(article.info.color);
padding: 2px 0;
margin-right: 2px;
}
.fa-calendar {
margin-right: 6px;
}
.fa-tag {
margin-right: 3px;
}
/* 要約文 */
.post-snippet {
font-size: 14px;
line-height: 1.7em;
color: $(article.description.color);
margin: 15px 0;
overflow: hidden;
}
.article-title-res {
display: none;
}
/* レスポンシブ(タブレット大縦) */
@media (max-width: 1024px) {
.article-title {
font-size: 16px;
}
.article-post-wrap {
height: 160px;
}
.article-thumbnail {
width: 60%;
min-width: 150px;
height: 150px;
}
.article-info-area {
font-size: 12px;
}
.post-snippet {
font-size: 13px;
height: 90px;
}
}
/* レスポンシブ(スマホ縦) */@media (max-width: 1024px) {
.article-title {
font-size: 16px;
}
.article-post-wrap {
height: 160px;
}
.article-thumbnail {
width: 60%;
min-width: 150px;
height: 150px;
}
.article-info-area {
font-size: 12px;
}
.post-snippet {
font-size: 13px;
height: 90px;
}
}
@media (max-width: 560px) {
.article-title {
display: none;
}
.article-title-res {
display: block;
font-size: 16px;
color: $(article.res.title.color);
height: 78px;
margin-bottom: 5px;
overflow: hidden;
}
.article-post-wrap {
height: 105px;
border-top: solid 3px $(article.res.border.color);
}
.article-thumbnail {
width: 102px;
min-width: 102px;
height: 102px;
margin-right: 10px;
}
.article-thumbnail img {
width: 100px;
height: 100px;
}
.article-post-date {
margin: 0 5px 0 0;
}
.fa-calendar {
margin-right: 3px;
}
.fa-tag {
margin-right: 0;
}
.post-snippet {
display: none;
}
}
改変の方法
記事の要約文を消したい
CSSを変更する方法(素人向け)
まずは下記の部分を探し出します。
/* 要約文 */
.post-snippet {
font-size: 14px;
line-height: 1.7em;
color: $(article.description.color);
margin: 15px 0;
overflow: hidden;
}
.post-snippet {
font-size: 14px;
line-height: 1.7em;
color: $(article.description.color);
margin: 15px 0;
overflow: hidden;
}
これを以下のように変更します。
/* 要約文 */
.post-snippet {
display: none;
}
.post-snippet {
display: none;
}
この方法はCSSの「display: none;」というプロパティを使って、HTMLで設定されている要約文を非表示にする方法です。SEO的には非推奨とされますが、普通のブログであれば特に支障は無いものと思われます。
HTMLを変更する方法(玄人向け)
まずは以下の部分を探し出して削除します。
<!-- 記事の要約 -->
<div class='post-snippet'>
<b:eval expr='data:post.snippet snippet {length: 110, links: false, linebreaks: false, ellipsis: true}'/>
</div>
<div class='post-snippet'>
<b:eval expr='data:post.snippet snippet {length: 110, links: false, linebreaks: false, ellipsis: true}'/>
</div>
次に以下の部分を探し出して削除します。
/* 要約文 */
.post-snippet {
font-size: 14px;
line-height: 1.7em;
color: $(article.description.color);
margin: 15px 0;
overflow: hidden;
}
.post-snippet {
font-size: 14px;
line-height: 1.7em;
color: $(article.description.color);
margin: 15px 0;
overflow: hidden;
}
.post-snippet {
font-size: 13px;
height: 90px;
}
font-size: 13px;
height: 90px;
}
.post-snippet {
display: none;
}
display: none;
}
この方法はソースコードから要約文に設定されている部分を丸ごと削除する方法です。ただし、一度削除すると再設定するのが大変なので、HTML・CSSを理解できていない方には非推奨の方法です(該当箇所をコメントアウトして様子を見ることがオススメ)。
記事リストのリンクを変更する
ソースを丸ごと変更する方法
以下のソースを「記事リストのソース該当部分」で示したHTML部分に上書きします。
このソースの内容は、リスト全体のリンクを外して、タイトル・サムネイルに記事へのリンクを、タグにラベルリンクを付けたものになります。
元に戻したい場合は「記事リストのソース該当部分のHTML」で再度上書きして下さい。
<b:includable id='articles'>
<!-- schema -->
<div class='articles-wrap' itemscope='itemscope' itemtype='http://schema.org/BlogPosting'>
<b:if cond='data:post.thumbnailUrl'>
<meta expr:content='data:post.thumbnailUrl' itemprop='image_url' />
</b:if>
<meta expr:content='data:blog.blogId' itemprop='blogId' />
<meta expr:content='data:post.id' itemprop='postId' />
<div class='articles-area'>
<h2 class='article-title' itemprop='name'>
<a expr:href='data:post.url'>
<data:post.title />
</a>
</h2>
<div class='article-post-wrap'>
<!-- サムネイル -->
<div class='article-thumbnail'>
<a expr:href='data:post.url'>
<!-- 記事に画像がある場合 -->
<b:if cond='data:post.firstImageUrl'>
<img expr:src='data:post.firstImageUrl' />
<!-- 記事に画像が無い場合 -->
<b:else />
<!-- 自分の画像URLに変更する -->
<img
src='https://blogger.googleusercontent.com/img/b/R29vZ2xl/AVvXsEh9y95lAZy1r4xHYohM2KDIbq2Q38idZJcrA7X2TZddCI7SCXmr8ct3N85sL044kcBxyK2e3VdXXeZyFfwOVbwZXlmSgkIFDV22eb8CUNnz0zICE3SJ6QNVOoOifphetfBIRbnQlxkJFGGA/s1600/noimage.png' />
</b:if>
</a>
</div>
<div class='article-post-area'>
<h2 class='article-title-res'>
<a expr:href='data:post.url'>
<data:post.title />
</a>
</h2>
<div class='article-info-area'>
<i aria-hidden='true' class='fa fa-calendar fa-fw' />
<div class='article-post-date'>
<data:post.date />
</div>
<div class='article-post-tag'>
<!-- タグがあるがどうか -->
<b:if cond='data:post.labels'>
<i aria-hidden='true' class='fa fa-tag fa-fw' />
<b:loop values='data:post.labels' var='label'>
<div class='article-label'>
<a expr:href='data:label.url + "?&max-results=10"' property='v:title' rel='v:url'>
<data:label.name />
</a>
</div>
</b:loop>
<!-- タグが無い場合は非表示 -->
<b:else />
</b:if>
</div>
</div>
<!-- 記事の要約 -->
<div class='post-snippet'>
<b:eval expr='data:post.snippet snippet {length: 110, links: false, linebreaks: false, ellipsis: true}' />
</div>
</div>
</div>
</div>
</div>
</b:includable>
次にCSS部分の「.article-title {…}」の下あたりに、以下のソースを追記します。
「.article-title {…}」は通常部分とレスポンシブ部分の「計2ヵ所」あります。
.article-title a {
color: #fff; /* ホワイト */
}
color: #fff; /* ホワイト */
}
この方法で変更することは出来ますが、ややデザインが崩れるので微調整が必要になります。その辺りについては、上記の該当部分のCSSの内容を変更して各自で調整してみて下さい。
スポンサーリンク
スポンサーリンク


コメント
6 件のコメント :
コメント失礼します。
記事リストをAmazonのように記事を横3列で表示でき
るようなカスタム方法はありませんか?
PCパーツのあれこれ さんへ
コメントありがとうございます
記事の横並びは以下のように指定すれば可能です
まずはテンプレートのソースから以下の部分を探します
=============================================================
<!-- それ以外 -->
<b:default/>
<b:loop values='data:posts' var='post'>
<b:include name='articles'/>
</b:loop>
=============================================================
この部分にdivタグを追加して以下のように書き換えます
=============================================================
<!-- それ以外 -->
<b:default/>
<div class='article-container'>
<b:loop values='data:posts' var='post'>
<b:include name='articles'/>
</b:loop>
</div>
=============================================================
上記は記事リストを読み込むループ全体を覆うdivタグです
クラス名は適当に「article-container」としています
次にCSSを変更します
テンプレートのCSS部分を以下のように変更します
なお、以下は「記事リスト」と検索して見つかる部分です
=============================================================
/* 記事リスト
------------------------------ */
/* article-container(追記) */
.article-container {
display: flex;
flex-wrap: wrap;
}
/* 記事リストのリンク(全体) */
.articles-wrap a:link {
text-decoration: none;
}
.articles-wrap a:hover {
opacity: 0.6;
}
/* 記事リスト全体 */
.articles-area {
width: 20vw; /* 追記部分(記事の横幅) */
background: #fff;
margin-bottom: 20px;
border-left: 1px solid #ddd;
box-shadow: 1px 1px 2px rgba(0,0,0, .4);
}
=============================================================
上記をコピペして上書きすれば、形としては横並びにできるハズです
.articles-area {}に追加したwidthを調整することで横幅を変更できます
ただし、細かい部分の設定はしていませんのでこのままではレイアウトが崩れます
デザインの詳細についてはご自身で変更してください
なお、上記を実行する前にテンプレートのバックアップは必ずとっておいてください
また、スマホ表示をそのままにしたい場合はレスポンシブ設定を加えて追記した部分の変更を無効化してください
ふでたまご さん
お返事ありがとうございます。レイアウトを何とかしてきれいにまとめまいと思います。
66歳でブログを始めてみようと、Smartを選びました。
トップページの記事リストの文字数を増やし、リストの縦幅を小さくしたいのですが、方法を教えていただけたらありがたいです。
記事リストの画像はいらないので、HTMLでサムネイルを小さくすることはできました。HTMLの意味は、全然分かっていませんが。
文字数を増やすには、HTML編集ページでpost-snippetを検索してください。
<b:eval expr='data:post.snippet snippet {length: 110, links: false, linebreaks: false, ellipsis: true}'/>
の110を変えてください。 50が最小で、1000が最大です。
BINUBALL さん
お返事、ありがとうございます。ご指摘の箇所を見つけて、数字を増やしてみましたが、なぜか変わりませんでした。
ちなみに、リストの縦幅は小さくする方法を見つけることができました。
コメントを投稿